CS2413: Web Site Development
WSD09:
Pacific Trails Resorts - Forms
|
Objectives:
- Create a form
- Style the with CSS
- Make the form viewable in screen, print, and mobile versions
- Include HTML5 feature in the form
Point Value:
- Full Credit: 30 points
- Late Credit: 10% penalty - maximum of 27 points
-
Extra Credit: 5, 10, or 15 Possible
Points
- Due dates are listed in
Assignments and Due Dates
Specifics:
Text Pages: Chapters 9 and 12
Downloads:
-
Student Data Files
-
images trailguide.jpg and yurtyoga.jpg for assignment will be in the
chapter12 folder
Reference:
Silent Video on YouTube.com which is a demonstration of the
completed assignment.
Disclaimer: If you see something that is contradictory to our class
assignments, please ask. Do not assume that since it is on the video
that it is 100% correct.
Sample assignment video:
Pacific Trails Resort - Forms
Only the pacific12 folder is shown in the video since it contains
the required and the extra credit specifications. The form assignment in
pacific9 would be the same as the form in pacific12.
Color Chart: There is also a
color chart
to help with color names and numbers.
Errata Sheet:
Chapter Updates for Chapter 9 and Chapter 12
In the new window, click on Chapter 9/ Chapter 12 and then
scroll to the bottom of center column to locate Chapter Updates.
The following is a modification of the Pacific Trails Resort case study
assignment located on pages 444-447 (Ch 9); 540-543 (Ch 12) of your
textbook. Follow the instructions as indicated below for this
assignment:
Pacific Trails Resort Case Study
See Chapter 2 for an introduction to the Pacific Trails Resort case
study. Figure 2.38 shows a site map for Pacific Trails. Use the Chapter
8 Pacific Trails website as a starting point for this case study. You
will create the new Reservations page that contains a form. You have the
following tasks in this case study:
- Create a new folder for this Pacific Trails case study.
-
Create the new Reservations page. Figure 9.43; page 447 is a
wireframe Pacific Trails Reservations page
-
Modify the style sheet to configure style rules for the new form for
all three versions (screen, mobile, print)
Hands-On Practice Case Study
Task 1: Create a folder.
Make a copy of the pacific08 folder. Rename
the copy pacific09. All work for this assignment will be done on the
files in the new pacific09 folder.
Task 2: Create the Reservations Page. Use the Home page
as the starting point for the Reservations page. Launch a text editor
and open index.html. Save the file as reservations.html. Modify your
reservations.html file to look similar to the Reservations page (shown
in Figure 9.43) as follows:
-
Change the page title to reflect the content of this page
Pacific Trails Resort :: Reservations by Firstname
Lastname
Note: “Firstname” and “Lastname” are to be
replaced with your name
-
Delete the image, paragraph, unordered list, and address in the
content area. Do not delete the logo header, navigation, or page
footer areas of the page.
-
Replace the text contained within the <h2> tags with: “
Reservations at Pacific Trails
”.
-
Configure a <h3> element on a new line with the following text: “Contact
Us”.
-
Add a <p> with the following text:
Required infomation is marked with an asterisk(*).
-
Configure a <form> element with the following attributes:
- method: post
-
action:http://webdevbasics.net/scripts/pacific.php
-
id and
name: myReservations
-
Configure form controls for the following items. Each control must
have a name, id, tabindex and
accesskey as well as a corresponding
label
element that is associated with the control by using the
for
element. Note that First Name, Last Name, Email, Arrival Date, and
Nights are required fields.
-
First Name
- type: textbox
- id and name: myFName
- label text: *First Name:
- accesskey: F
- tabindex: 1
- required
-
Last Name
- type: textbox
- id and name: myLName
- label text: *Last Name:
- accesskey: L
- tabindex: 2
- required
-
Email
- type: email (Use this HTML5
type)
- id and name: myEmail
- label text: *Email:
- accesskey: E
- tabindex: 3
- required
|
-
Phone
- type: tel (Use this HTML5 type)
- id and name: myPhone
- label text: Phone:
- accesskey: P
- tabindex: 4
-
Arrival
- type: date (Use this HTML5
type)
- id and name: myArrival
- label text: *Arrival:
- accesskey: A
- tabindex: 5
- required
-
Nights
- type: number (Use this HTML5
type)
- id and name: myNights
- label text: *Nights:
- min: 1
- max: 14
- accesskey: N
- tabindex: 6
- required
|
-
Comments
- type: textarea
- id and name: myComments
- label text: Comments:
- rows: 2
- cols: 20
- accesskey: C
- tabindex: 7
-
Submit
- type: submit
- id and name: mySubmit
- accesskey: S
- tabindex: 8
- class: printHidden
- value: Submit Form
- label: not included
-
Reset
- type: reset
- id and name: myReset
- accesskey: R
- tabindex: 9
- class: printHidden
- value: Clear Form
-
label: not included
|
-
Be sure to close the form element using </form> which must be
located after the submit and reset buttons.
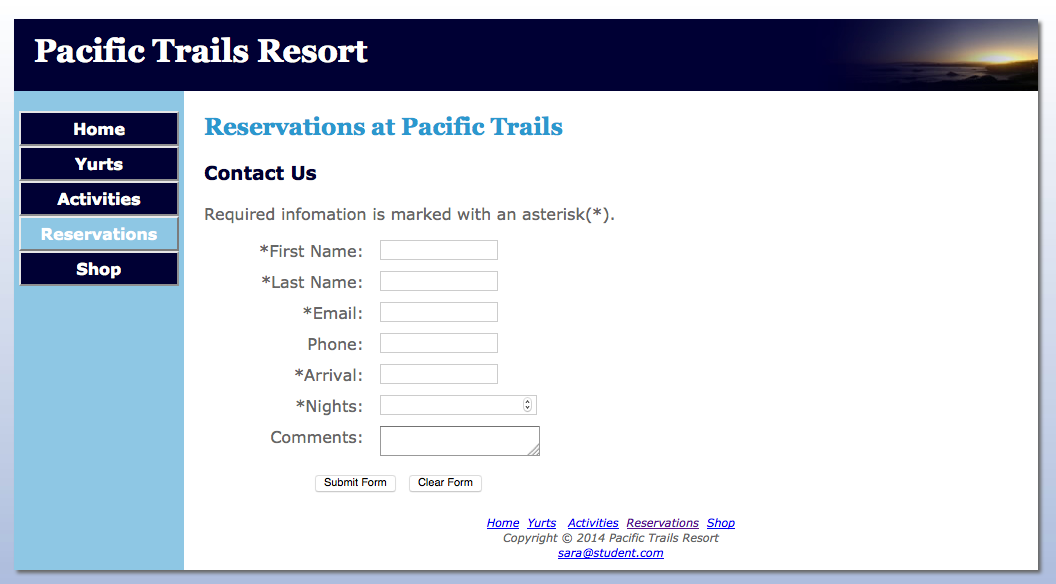
- Save and validate the reservations.html file.
Screen
version
withOUT CSS styling
Task 3: Configure the CSS. Modify the external style
sheet (pacific.css). Open pacific.css in a text editor.
The text
labels for the form controls will be on the left side of the content
area and there will be empty vertical space between each form control.
To accomplish this, configure CSS as indicated below:
-
Create a section in the css file by using comments where all of the
styles related to reservations will be included.
Example:
/* ---------------------------- Forms --------------------------
*/
-
Create a <label> element selector to float to the
left
with block display. Assign
a
width of
10em, set right padding to 1em,
and right align the text in the
<label> elements.
-
Configure the <input> element and <textarea> element selectors with
display of block and a bottom
margin of
1em.
-
Configure an id named mySubmit with
a left margin of 10em and display
as inline.
-
Configure an id named myReset with
a left margin of 0.5em and display
as inline.
-
In the print version, the Submit and Reset buttons are not used so
they should not be shown. In pacific.css within @media print { }
which is for the
print version configure a class
named printHiddenset the visibility
property to hidden.
-
In the smartphone version the layout will be vertical. The labels
will appear above the form elements not to the left of them. The
Reset button will appear below the submit button not next to it.
Within the
@media only all and (max-width:768px){}
section of the pacific.css file,
-
Configure the myReset and mySubmit ids with a left margin of
2em and display of block.
-
Configure the <label>, <input> and <textarea> form element
with the following properties:
clear -
both, left margin - 2em,
top margin - 0.1em, text
aligned-left
- In the tablet version, there will be no additional changes.
-
Save and validate the HTML and CSS. View the four versions (screen,
smartphone, tablet, and print) to verify that they display
correctly.
-
Test the required field validation by submitting the form in Firefox
and/or Chrome. Leave fields blank or enter incorrect data to see if
the HTML5 validation works as it should.
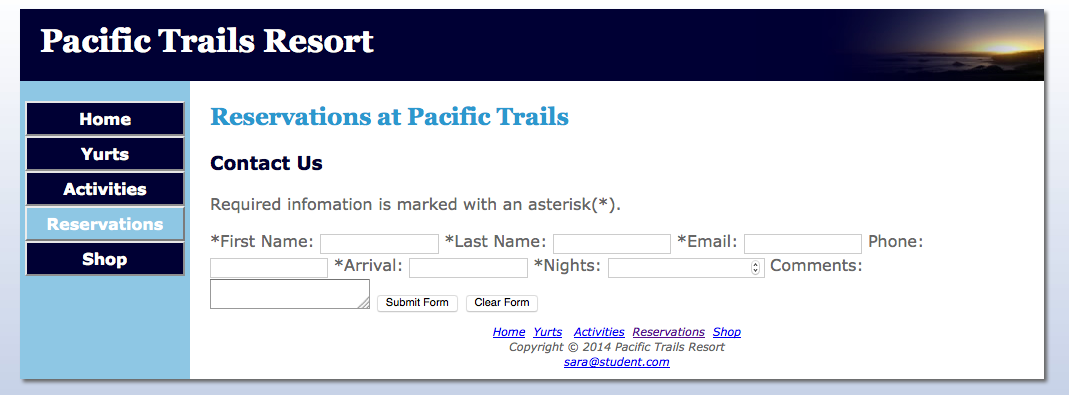
|
Screen Version
|
|
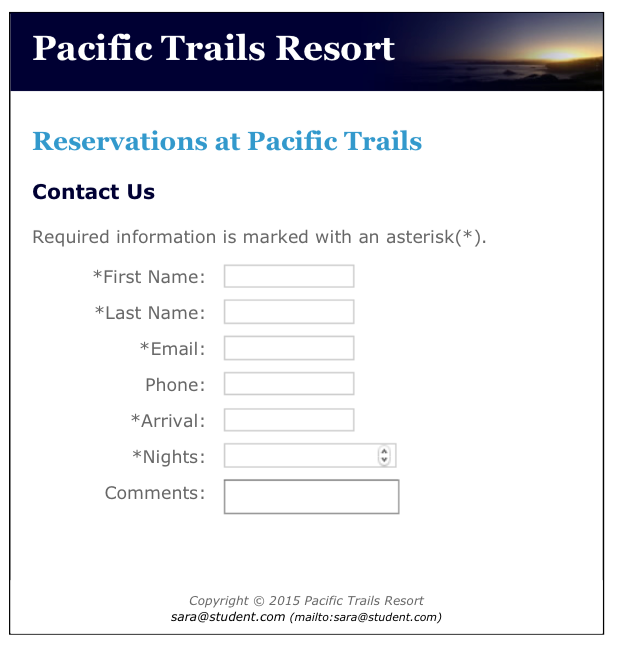
Print Version
|
|
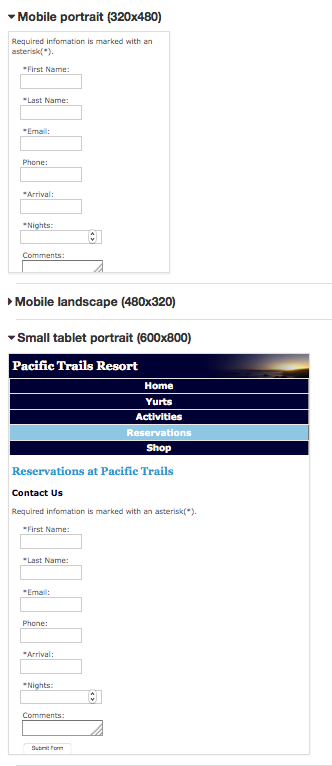

Mobile Versions
|
If you would like to do the extra credit, continue on with the
instructions for Chapter 12 below.
Chapter 12 - E-Commerce (Extra Credit)
Earn a maximum 15 possible points. This is extra credit which means
students must figure it out on their own. Lab assistants and tutors will
be instructed that this is an assignment that must be done solely by the
student. I will be willing to help students after the final due date,
but not before. This is to be your project.
- Create a screen version and earn maximum of 5 possible points.
-
Create a screen and print version and earn a maximum of 10 possible
points.
-
Create a screen, print, smartphone, and tablet version and earn a
maximum of 15 possible points.
See Chapter 12 for an introduction to the Pacific Trails Resort case
study. A new web page will be added for selling books on yoga and hiking
at Pacific Trails Resort. The new page will be part of the site
navigation system and all pages must link to it. Figure 12.12 (p. 541)
shows a revised site map for Pacific Trails. If you choose to do the
extra credit, it will be done in your Pacific09 folder.
CAVEAT: Since new shop page will be part of your website, if it does
not validate, the Chapter 9 assignment also will not be eligible for
grading (not just the extra credit portion). So check and double check
the CSS and HTML validation.
Task 1: Create the Shop Page. Use the Home page as
the starting point for the Reservations page.
- Launch a text editor and open index.html.
-
Add a new "button" link in the left navigation that links to
shop.html.
- In the footer "text" navigation, likewise add a link to
shop.html.
- Save index.html.
- Then save again as as shop.html.
-
Add the additional navigation to the Activities and Reservation
pages.
-
Modify your shop.html file to look similar to the Shop page
shown in this assignment.
-
Change the page title to reflect the content of this page
Pacific Trails Resort :: Shop by Firstname
Lastname
Note: “Firstname” and “Lastname” are to be
replaced with your name
-
Delete the image, paragraph, unordered list, and address in
the content area. Do not delete the logo header, navigation,
or page footer areas of the page.
-
Replace the text contained within the <h2> tags with: “Shop
at Pacific Trails”.
-
Create the Hiking Guide item:
-
Configure an <h3> element to display "Pacific Trails
Hiking Guide
-
Write the HTML to display the trailguide.jpg image.
All required attributes must be included.
-
Code a paragraph that will display the following:
Guided hikes to the best trails around Pacific
Trail Resort. Each hike includes a detailed route,
distance, elevation change, and estimate time. 187
pages. Softcover. $19.95.
-
Each item for sale has an “
Add to Cart
” button, which is contained within a form
with an action attribute set to invoke the
http://www.webdevfoundations.net/scripts/cart. asp
server- side script.
Remember that whenever you use
server- side scripts, there will be some
documentation or specifications for you to follow.
This script processes a limited shopping cart that
only works with two items. The shop. html web page
will pass information to the script by using hidden
fields in the form that contains the button to
invoke the script. Please pay careful attention to
detail when working on this. To add the shopping
cart button for the Hiking Guide book below the
description paragraph, write the following code.
Add id, accesskey, and tabindex attributes where
required.

This HTML invokes a server- side script that
processes a demonstration shopping cart. The hidden
fields named desc1 and cost1 are sent to the script
when the Submit button is clicked. These indicate
the name and cost of the item.
- Code a line break <br> with a class of
clear.
-
Create a Yoga item
- Configure an <h3> element to display "Yurt Yoga"
- Write the HTML to display the yurtyoga.jpg image
-
Code a paragraph that will display the following:
Enjoy the restorative poses of yurt yoga in the
comfort of your own home. Each pose is illustrated
with several photographs, an explanation, and a
description of the restorative benefits. 206 pages.
Soft-cover. $ 24.95
-
Each item for sale has an “
Add to Cart
” button, which is contained within a form
with an action attribute set to invoke the
http://www.webdevfoundations.net/scripts/cart. asp
server- side script.
Remember that whenever you use
server- side scripts, there will be some
documentation or specifications for you to follow.
This script processes a limited shopping cart that
only works with two items. The shop. html web page
will pass information to the script by using hidden
fields in the form that contains the button to
invoke the script. Please pay careful attention to
detail when working on this. To add the shopping
cart button for the Hiking Guide book below the
description paragraph, write the following code.
Add id, accesskey, and tabindex attributes where
required.

This HTML invokes a
server- side script that processes a demonstration
shopping cart. The hidden fields named desc2 and
cost2 are sent to the script when the Submit button
is clicked. These indicate the name and cost of the
item.
- Code a line break <br> with a class of
clear.
-
Save your page and test it in a browser. Click the Add to
Cart button for one of the books. Experiment with the cart
and try to purchase both items. You can simulate placing an
order (See Figures 12.7 and 12.8 on pp. 522 -523. This is
for JavaJam Case study but it should let you see the basic
processing. The shopping cart and order pages are for
demonstration purposes only.
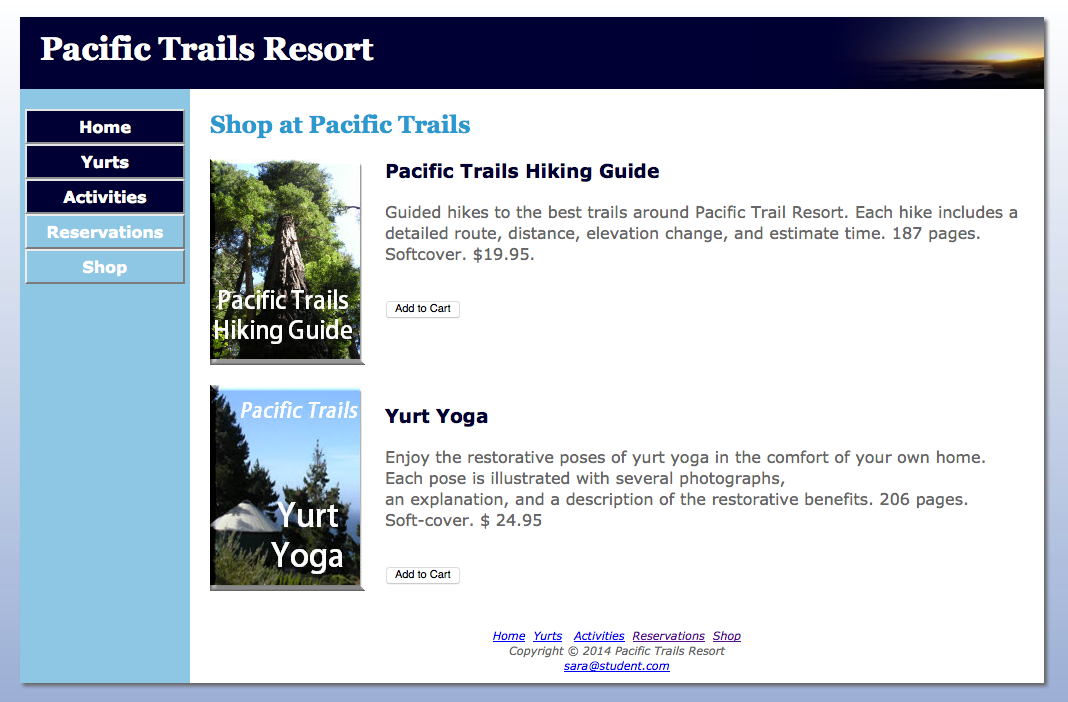
Screen Version
|
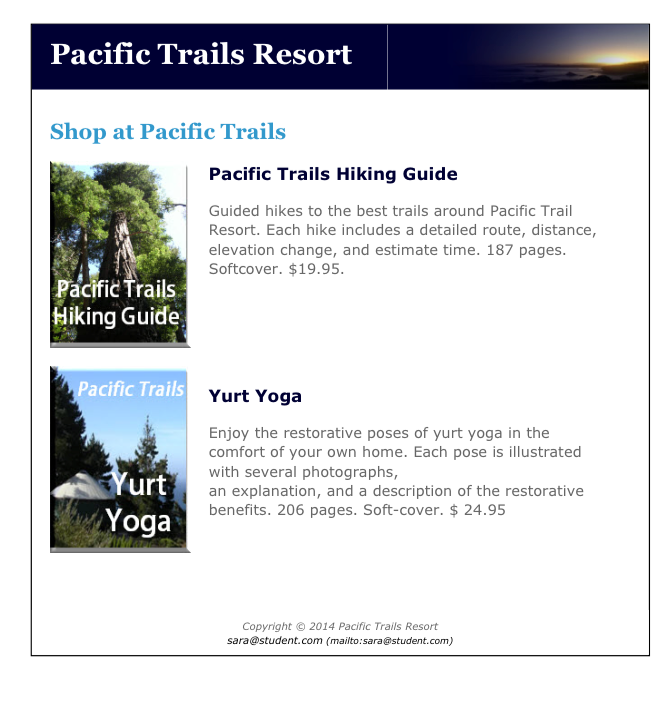
Print Version
|

Tablet and Smartphone Versions
|
Task 2: Configure the CSS. Modify the external
style sheet (pacific.css). Open pacific.css in a text editor.
-
Configure the <form> so there is 2em of padding below each
form.
form {padding-bottom:0.2em;}
Task 3: Tablet, Smartphone, and Print Versions.
The text provides instructions for the screen versions.
Students must determine the modifications needed for the print and
tablet/smartphone versions.
-
Mobile version
- must use the vertical format.
-
In the smartphone/tablet versions, the CSS code
currently is configured so no images are displayed.
However, for the shopping cart, the images must be
displayed. Consider wrapping the shopping cart in a div
with an id of something like "shoppingCart". Then the
images in that area can be accessed by using
#shoppingCart img {....} Code could be written to
override the defaults for mobile web pages.
-
In the smartphone/tablet versions, the CSS code
currently is configured so the descriptions are
displayed next to the images. It would probably be
better if they were below. In each of the forms,
consider wrapping the <p> and <form> elements in div
with a class of something like "productDescription". In
the mobile media queries, add a property to this class
to clear both. This will force the product name,
description, and Add to Cart button below the image.
- Print Version
-
The "Add to Cart" buttons are not to be displayed on the
print version.
-
All elements requiring a name and id must have one assigned.
- TabIndex and AccessKeys must be used
- Save your pages, validate and view them.
Final Steps for both Required Assignment and Extra Credit:
Publishing:
FileZilla upload the entire
pacific09 folder to your Apollo web site.
-
Access your web pages using the following URL
http://apollo.occc.edu/user#####/pacific09 (user##### will
be replaced by the login provided by your instructor.)
-
The Pacific Trails Resort homepage must appear without any
further navigation or clicking.
Desktop Version:
- Display your pages in a desktop browser.
-
The pages should look the same as they did before you
started this case study.
- Validate the CSS and HTM on ALL pages - Extra Credit
included.
- Test the navigation between the pages.
Tablet Version:
- Validate the CSS and HTM on all pages.
-
Use the Web Developer Tool Bar (Addon for Chrome or
Firefox). Go to Resize | View Responsive Layouts. Check the
the landscape and portrait versions for both tablet and
small tablet. Click on each of the links (Home, Yurts,
Activities) to verify that the pages display correctly.
- Test the navigation between the pages.
Smartphone Version:
- Validate the CSS and HTM on all pages.
-
Use the Web Developer Tool Bar (Addon for Chrome or
Firefox). Go to Resize | View Responsive Layouts. Check the
the landscape and portrait versions for mobile. Click on
each of the links (Home, Yurts, Activities) to verify that
the pages display correctly.
- Test the navigation between the pages.
Print Version:
It is recommended
that Print Preview or Preview as PDF be used to save paper and
printer ink/toner.
-
To check this in the browser, print background color must be
turned on.
-
FireFox: in Print check the boxes for "Print
Background Colors” and "Print Background Images".
-
Internet Explorer: in Page Setup check "Print
Background Color and Images"
- Safari: in Print check "Print Backgrounds"
-
Chrome: under Options select "Background Color and
Images"
- Be sure the buttons do not display in the print version.
-
Print version will be graded in Firefox and/or Chrome.
Common Requirements for All Web Pages
-
The web pages must display correctly in all of the
following: FireFox, Chrome, Internet Explorer.
-
The links between the existing pages with the Pacific Trails
Resort website cannot be broken.
-
All HTML and CSS code must be well documented, properly
indented, and easy to read.
http://css-tricks.com/examples/CleanCode/Beautiful-HTML.png
http://coding.smashingmagazine.com/2008/05/02/improving-code-readability-with-css-styleguides/
Mandatory Requirements
Failure to adhere to and/or include the following items will
prevent the assignment from being graded.
Note: If time permits, the assignment can be resubmitted
during the late/resubmit period, but there will be a 10%
penalty.
-
No additional formatting is allowed at this point in time
only what is outlined in the text.
-
All pages must include DOCTYPE,
<meta> tag, and <html> tag information.
-
The link to the web page in the submission area of the LMS
must open the homepage in a new browser window.
-
All web pages must validate
(HTML5 and CSS) without errors using the Web Developer Tool
Bar in FireFox or Google Chrome.
Validate for
CSS3.
Assignment Submission:
There are two parts to submitting the assignment: uploading
the website to the Apollo server and submitting the URL
within the LMS.
-
Uploading to the Apollo Server
- The entire pacific09 folder must be uploaded to the
server
-
The homepage for the Pacific Trails Resort website
must be index.html
-
Submitting the URL within the LMS
-
In the LMS, use the submission area located in this
week's folder
- In the text box, create a links to both websites.
-
The web pages must open
in a new window.
Need help creating the link? Check out
"Submitting an URL in the LMS" which is located in
the Help Files, References, and Tutorials folder
(inside the LMS)
-
Clicking on the
http://apollo.occc.edu/#####/pacific09 link
mustresult in the home pages being displayed.
If a listing of files/folders is displayed, there is
an error. (##### is to be replaced by your login)